4 perfect crafts for a rainy day project and a great way to reuse old CDs and empty CD jewel cases you may have around your home. Fun for all ages, creating CD Fish, beautiful wind spinners, CD weavings and botanical sun catchers.
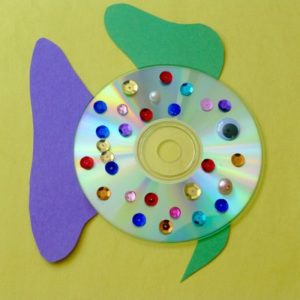
CD FISH
An ideal craft for 5-7 year olds. I have done this with kiddos at beach-themed birthday parties and a “under the sea” yoga themed classes. This cute project is also a wonderful adjunct to reading the Rainbow Fish books. 
Supplies:
- Old CDs or DVDs
- Construction paper
- Craft glue
- Sequins of varied colors and sizes
- Googly eyes
Instructions:
- Cut top, back and bottom fin, and lips out of construction paper and glue to CD (I glue all but front fin to back of CD so rough edges won’t show)
- Have children, (you may need to help the younger ones), place dots of glue around the CD, then let them place their sequins and googly eyes on the glue
CD WIND SPINNERS
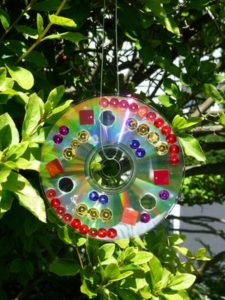
Gorgeous ornaments that reflect light as they spin and swing in the breeze. These decorated CDs are easy to make and fun for all ages to create.
 Supplies:
- Old CDs or DVDs
- Craft Glue
- Craft gems, jewels, sequins, buttons, etc.
- Fishing line
Instructions:
- Place or swirl glue onto CD and glue on your decorations. Younger children will place objects randomly all over the CD, while older kids will tend to create defined patterns/designs.
- Tie the fishing line thru the hole and around one edge, then hang in your window or a branch of a tree and watch them spin and swirl
My elementary school yogis have created stunning mandalas using CDs and various craft items to enhance a mandala-themed yoga class.
CD WEAVING
Mindfulness, to create such focused beauty.
This craft is a little more complicated, but I find can be adapted for children as young as 5.
Giving children the opportunity to weave can help develop many skills:
- Manual Dexterity and Manipulative Skills/Pincer Grip – This activity helps to develop the strength between the thumb and forefinger, the Pincer Grip. Children naturally practice this as they hold onto the yarn or similar item being threaded. This is also a pre-writing skill!!!!
- Hand & Eye Coordination – Weaving helps develop hand-eye coordination as it encourages children to use the visual information received to coordinate the movement of the hands.
- Concentration and Problem Solving – It isn’t an uncommon sight to see children really concentrate when they weave. The room is quiet while they focus to accomplish this task.
- Creativity – Children can get very creative when it comes to weaving. There are really no right or wrong ways of doing it. They might choose to use different objects or create patterns. When weaving they are learning patterning, and they cross the midline, which reinforces brain development between the right and left hemispheres.
- Critical Thinking Skills
- Builds Self-Confidence with successful experiences
Supplies:
- Old CDS or DVDs
- Scrap yarn, thin material strips, feathers, pipe cleaners
- Scissors
- Yarn needles
Instructions:
- Warp the CD: A smooth yarn works best, and use a thicker yarn for younger weavers. The warp yarn is between 4 and 6 feet long. Tie it to the CD by putting one end through the center hole and knotting it to itself on the back. Turn the CD over to the front, pulling the thread through the center and wrapping around the CD, creating the spokes. Make sure the warp threads are pretty tight!

The total number of warp threads can vary, as long as it’s an uneven number. The fewer spokes, the faster it is to weave, but the looser the weaving will be, especially out near the edge. (It works well to have 13 or 15 for the younger kids, and older students may use a finer yarn or string and have as many as 25 or 27 warp threads.)
Now you’re ready to weave!
- Choose your first yarn. It will be the center of your weaving. Attach it on the back of the CD by tying it to one of the warp spokes.
- Knot the other end to the needle. Push the needle up through the center hole to the front side.
- Weave over under, over under.

- When you get near the end of your yarn, attach another yarn using a square knot. The kids may need help with this. When you add a new yarn, leave the tail long enough to tuck in after you’ve done a few more stitches so you can see where the knot needs to tuck in. If the tails are too short, they are harder to tuck in.
- For older children, it works best to hold the CD in their hands as they weave, weaving in a counter clock-wise direction. Push the needle under a warp spoke and then off the edge, repeating over/under for a few spokes before pulling the yarn all the way through and then down and tight.

It is fun to use a variety of yarns, including textured and fluffy yarns. You can weave in a piece of thin ribbon, a feather or a pipe cleaner. These are more challenging to work with, but encourage creativity. When you get to the last round, end by tying the yarn to one of the warp spokes and tucking in the end.
GORGEOUS!!!
BOTANICAL SUN CATCHERS
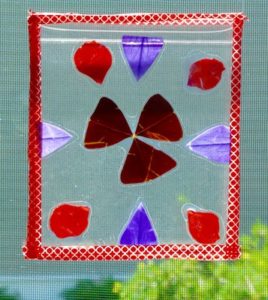
Transform empty clear CD jewel cases into beautiful sun catchers. A quick craft for children of all ages.
In children’s yoga classes, I use this craft to teach about nature and the Earth. While creating these dazzling sun catchers, we may listen to music about our beautiful sun and do a few sun salutations during our activity.
Music suggestions: “Sun Dance (Salutation)” by Linda Lara from CD Musical Yoga Adventures; “Here Comes the Sun” by James Taylor and YoYo Ma from CD Songs of Joy and Peace; “You Can Make the Sun Shine” by GuruGanesha Singh from CD Kundalini Surjhee; “The Sound of Sunshine” by Michael Franti and Spearhead, from the CD The Sound of Sunshine.
Supplies:
- Empty Clear CD Jewel Cases
- Clear Self-Adhesive Shelf Liner or Self-Adhesive Laminating Sheets

- Colored Masking Tape or Washi Tape (Optional)
- Flower petals, leaves, etc.
Instructions:
- Gather flowers, colorful leaves, etc. and take them apart
- Use the CD case to trace the outline on the clear sheet of adhesive, then cut so that the adhesive liner is slightly larger on all sides
- Remove the back of the CD jewel case, and have the kids arrange their petals and leaves however they want on top of the case.
- Carefully layer the sheet of clear adhesive on top of the botanical design, (this can be tricky).
- Trim any excess liner and thread fishing line through the holes in the CD case for hanging.
- If you like, use colored masking tape or Washi Tape to create a frame around the outside edge of the case.
Hang in a sunny window and enjoy!
I am a child
Of the Moon
Being raised by the Sun
In a world walked by stars
And a sky drawn with flowers
–Zara Ventris
Leave a Reply